Use Ground Control Points
Ground control points can be used by uploading an additional text file along with the input images, named gcp_list.txt. Below you'll find instructions on creating one by using the GCP Interface.
You must have purchased at least 1,800 or more credits within a year or be signed up with a monthly plan to access the GCP Interface.
In this guide, it is assumed that imagery has already been captured with at least 5 GCP targets in sight and those targets have been measured. See Getting Ground Control Points.
Import GCP Measurements
Using the CSV exported from your surveying device, you should now have a CSV file that looks like:
GCP Label,Northing,Easting,Elevation
GCP-1,235269.88,3811198.11,0.20
GCP-2,235246.25,3811220.60,0.25
[ ... more points ... ]
The software will search for the following columns in the CSV file:
- GCP Label: GCP Label, Label, Name, GCP
- X: Easting, X, Longitude, Lon
- Y: Northing, Y, Latitude, Lat
- Z: Elevation, Z, Altitude, Alt
These are the locations of the GCP targets. It is also necessary to know the coordinate reference system (CRS) that was used. In this example, WGS 84 / UTM zone 11N was used, which corresponds to the EPSG code 32611.
From the GCP Interface, select your CSV file and type the EPSG code (or PROJ.4 definition) of your coordinate system. Then press Go to next step.
If the interface doesn't recognize an EPSG code, the Go to next step option will be disabled. In such cases, use a PROJ.4 string definition, which you can find in a database like epsg.io. Search the EPSG code, then look for the definition from the PROJ.4 export tab.
If the map doesn't load in the correct position, verify that you haven't swapped the Northing/Easting (X/Y) coordinates and ensure you've selected the correct coordinate system.
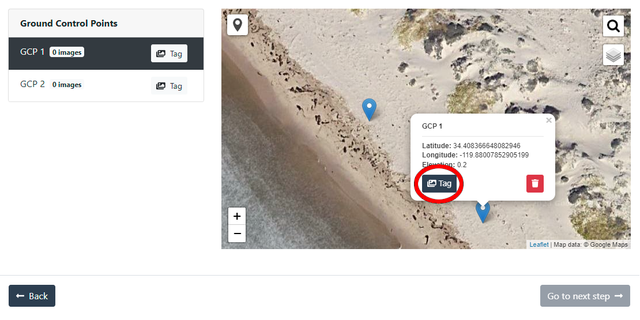
Tag Images
Select a GCP location on the map and click the Tag button:
Click Browse and select the images of your project. If your images are georeferenced, the GCP interface will automatically filter/sort the images by distance from the GCP. If your images are not georeferenced, you will need to manually select them.

- To tag an image, simply click the location of the target. The border of the image will turn green.
- To zoom in on an image, hold the Shift key and use your mouse wheel.
- To remove a tag, click the
Xbutton. - To undo all changes to a GCP, press the Cancel button at the bottom of the page.
Once you are done tagging all the images that contain the GCP:
- Press the Save Changes button at the bottom of the page.
- Select the next GCP from the map and repeat until all GCPs have been tagged with at least 3 images.
The ideal number of images to tag per GCP is between 8 and 12. There are diminishing returns when tagging more images per GCP. In some cases, tagging too many images can even negatively impact accuracy.
Make sure there's a clear line of sight between the camera and the GCP. If there are trees, buildings or other objects near the GCP, avoid tagging those images or the reconstruction might fail.
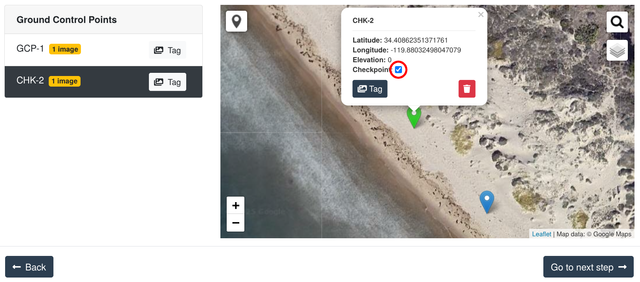
Marking Checkpoints
You can mark one or more ground control points as checkpoints by clicking a marker on the map and toggling the Checkpoint checkbox from the popup. The selected checkpoint will be marked in green.
Checkpoints are useful for checking the accuracy of computation. They are left out from the computation and are instead used to measure the accuracy of the results.
You can have as many checkpoints as you want, but make sure to always have at least 3 ground control points.
Export GCP File
From the Map view, press the Go to next step button. Review that the information looks correct.
Your GCP file can be exported by pressing the Download gcp_list.txt button.
You can resume work on a GCP file by dragging and dropping the gcp_list.txt file along with the project's images by clicking the Resume Work on GCP File button from the home screen of the GCP interface.
Use the GCP File
To use the ground control point file, simply upload it along with the images when creating a task in WebODM Lightning.
Vertical Datums
Unless otherwise specified, elevation (Z) values are assumed to be relative to the WGS84 ellipsoid (ellipsoidal height). If your vertical datum is different, you can specify it with a proper EPSG code by adding it with the + sign as follows:
EPSG:<horizontal>+<vertical>
For example, for NAD83(2011) / New Jersey (ftUS) + NAVD88 height (ftUS) (6527 and 6360) you would use the definition:
EPSG:6527+6360
Geoids
When you specify a vertical datum, the program will attempt to choose a suitable geoid. If you know the exact geoid ID, you should specify it by appending it in parenthesis after the vertical datum code as follows:
EPSG:<horizontal>+<vertical>(<geoid>)
For example:
EPSG:6527+6360(GEOID18)
See Geoids for a complete list of supported Geoids.